


Let's create a website that integrates an API to show useful information such as the weather. Here's a comprehensive guide with simplified steps that any beginner can follow along.
Ingredients:
HTML/CSS for the webpage
JavaScript for talking to the API
VSCode or Code Editor of your choice
WeatherAPI is the API we'll use
Postman to test the API
The Steps:
Set up your editor and files
We'll begin by creating a new project in your Code Editor.
For VSCode users, Head over to Explorer -> Open Folder -> (Open your Desired folder or create a new folder).
Go to File -> New File. We'll name this file
index.html.
Set up your account on WeatherAPI Website
Creating an account on WeatherAPI is very easy. Just SignUp at the HomePage and enter your email id and set a password. An API key will automatically be created for you which will be available in your Account Page.
An application programming interface (API) key is a code used to identify and authenticate an application or user. It is unique to your account.
To know more about APIs in general, please read my previous blog post.
⚠️ It is very important that you keep your API key private and not share it with others for privacy and to avoid potential misuse of your API account. ⚠️
Read WeatherAPI docs to know all about their service.
Begin Coding 🚥
- You have already made index.html. Let's start by typing some code in it.
💡Tip: Type
docand press enter to create boiler code for HTML.
<html lang="en">
<head>
    <meta charset="UTF-8">
    <meta http-equiv="X-UA-Compatible" content="IE=edge">
    <meta name="viewport" content="width=device-width, initial-scale=1.0">
    <title>Weather Website</title>
</head>
<body>

</body>
</html>
- Let's start by adding a heading and a form to input data.
    <h1 class="text-center">Weather</h1>
    <form >
        <input id="cityname" type="text" placeholder="Enter City Name">
        <button id="search" type="button" class="btn btn-outline-primary">Search</button>
    </form>
Add temperature card.
 <div class="card">
     <div class="temperature-container">
         <p class="text-left">Current Temperature:</p>
         <p class="text-right" id="currtemp"></p>
     </div
 </div
Repeat the code to add Condition and Windspeed.
We then wrap this in a section to make it pretty later.
Here's the entire HTML file.
<!DOCTYPE html>
<html lang="en">
<head>
    <meta charset="UTF-8">
    <meta http-equiv="X-UA-Compatible" content="IE=edge">
    <meta name="viewport" content="width=device-width, initial-scale=1.0">
    <link href="style.css" rel="stylesheet">
    <title>Weather</title>
</head>
<body>
    <section>
        <div class="container">
            <div class="name">
                <h1 class="text-center">Weather</h1>
            </div>
            <div class="card">
                <form>
                    <input id="cityname" type="text" placeholder="Enter City Name">
                    <button id="search" type="button" class="btn">Search</button>
                </form>
                <div class="card">
                    <div class="temperature-container">
                        <p class="text-left">Current Temperature:</p>
                        <p class="text-right" id="currtemp"></p>
                    </div>
                </div>
                <div class="card">
                    <div class="temperature-container">
                        <p class="text-left">Condition:</p>
                        <p class="text-right" id="condition"></p>
                    </div>
                </div>
                <div class="card">
                    <div class="temperature-container">
                            <p class="text-left">WindSpeed:</p>
                            <div class="temperature-container">
                                <p class="text-right" id="windspeed"></p>
                            </div>
                    </div>
                </div>
            </div>
        </div>
    </section>

//Scripts
    <script type='text/javascript' src='config.js'></script>
    <script type='text/javascript' src="index.js"></script>
</body>
</html>
Add some style 🤵🏻
You can learn all about CSS from W3Schools. Create a new file called style.css. This is the Stylesheet we'll use for styling the website.
body {
    font-family: Arial, sans-serif;
    background-color: #C1CFEA;
    margin: 0;
    padding: 0;
}

.container {
    max-width: 600px;
    margin: 0 auto;
    padding: 20px;
    text-align: center;
}

h1 {
    color: #333;
    margin-top: 0;
}

sup {

    color: #333;
    margin-left: 3.5px;
}

p {
    font-weight:lighter;
    color: #333;
    margin-top: 0;
}

form {
    margin-bottom: 20px;
}

input[type="text"] {
    background-color: #fff;
    width: 80%;
    padding: 10px;
    border-radius: 5px;
    border: none;
    outline: none;
    box-shadow: 0 2px 5px rgba(0, 0, 0, 0.2);
}

button {
    margin-top: 5%;
    width: 100%;
    padding: 10px;
    border: none;
    border-radius: 5px;
    background-color: #007bff;
    color: #fff;
    font-weight: bold;
    cursor: pointer;
    transition: background-color 0.3s ease;
}

button:hover {
    background-color: #0056b3;
}

.card {
    margin: 5px;
    background-color: #fff;
    border-radius: 10px;
    padding: 20px;
    box-shadow: 0 2px 5px rgba(0, 0, 0, 0.2);
}

.temperature-container {
    display: flex;
    align-items: center;
    justify-content: space-between;
}

.temperature-container p {
    margin: 0;
}

.text-left {
    text-align: left;
}

.text-right {
    text-align: right;
}

@media (max-width: 768px) {
    .container {
        padding: 10px;
    }
}
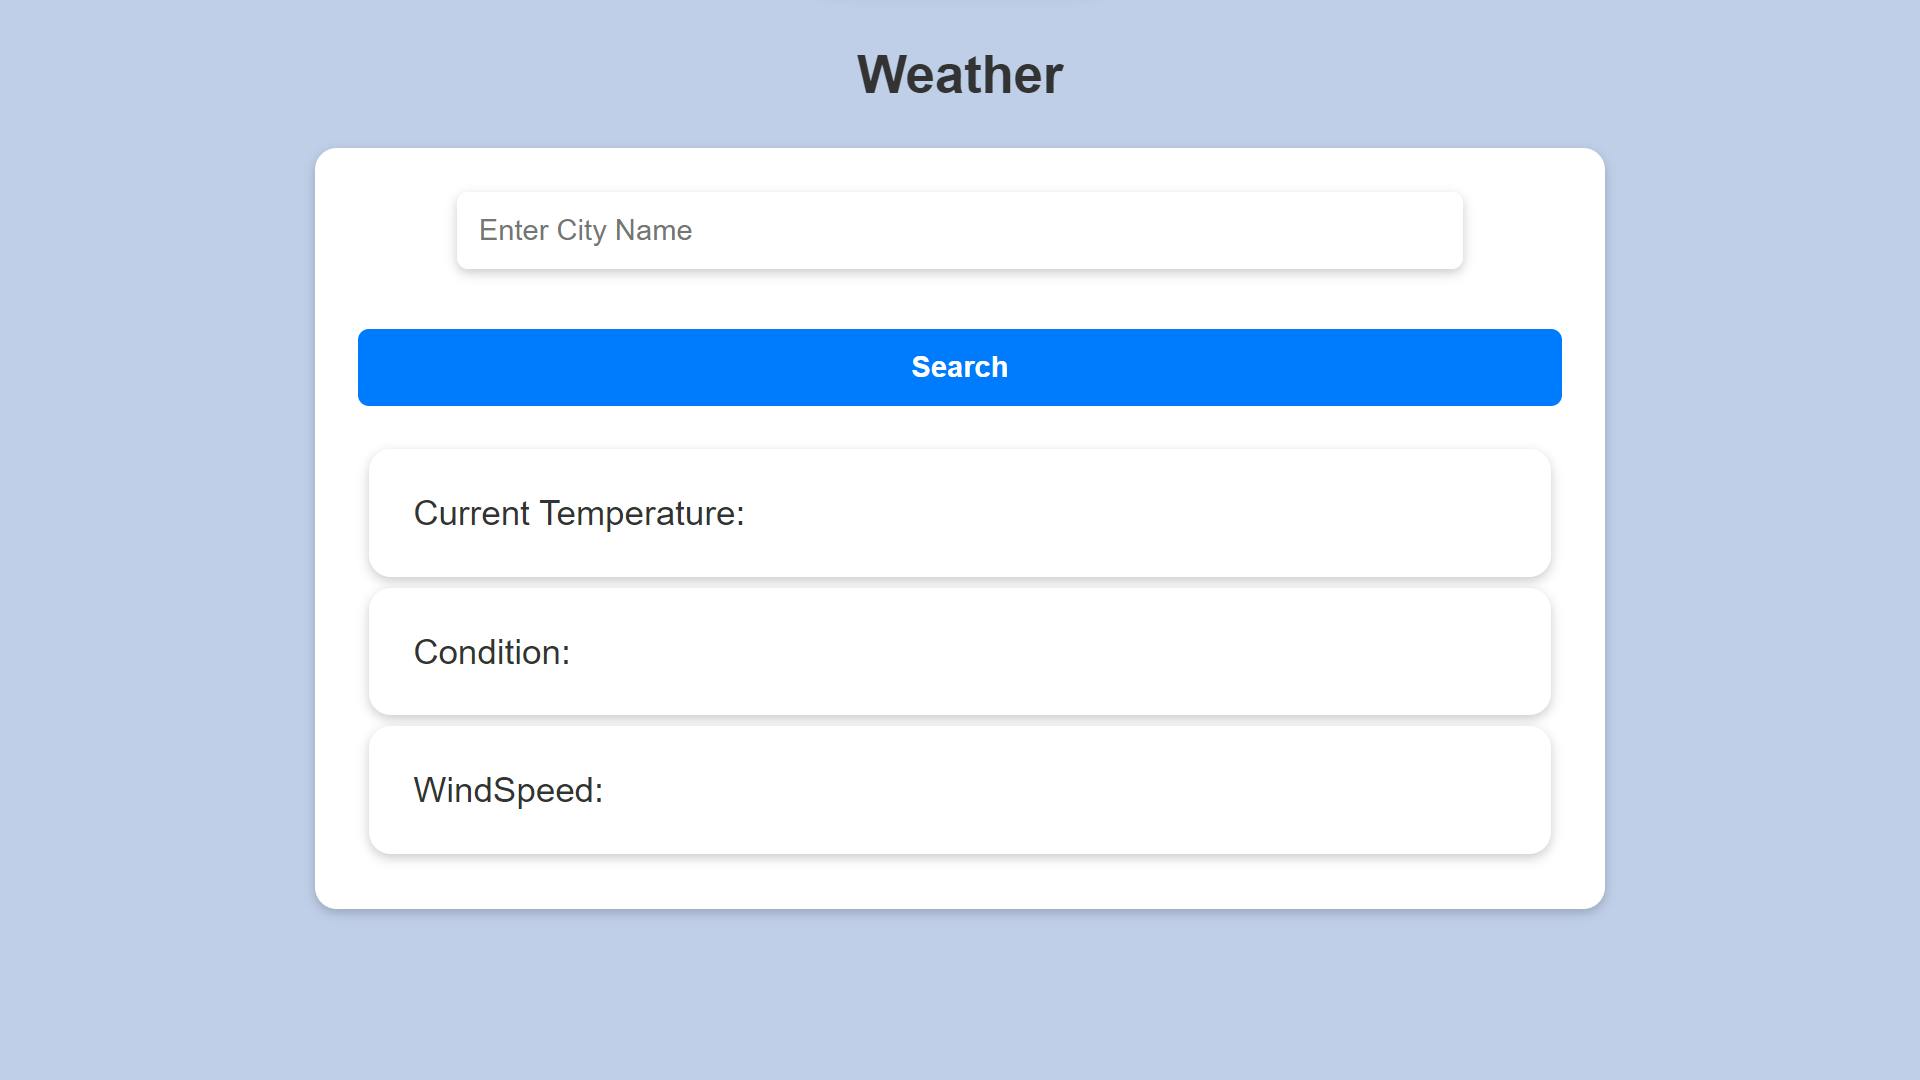
The website looks like this now.👇🏻
Let's call the API to know what it's up to 📞
Go to Postman and create an account. Once you do that, you can see a space to enter our URL to call the API beside GET.
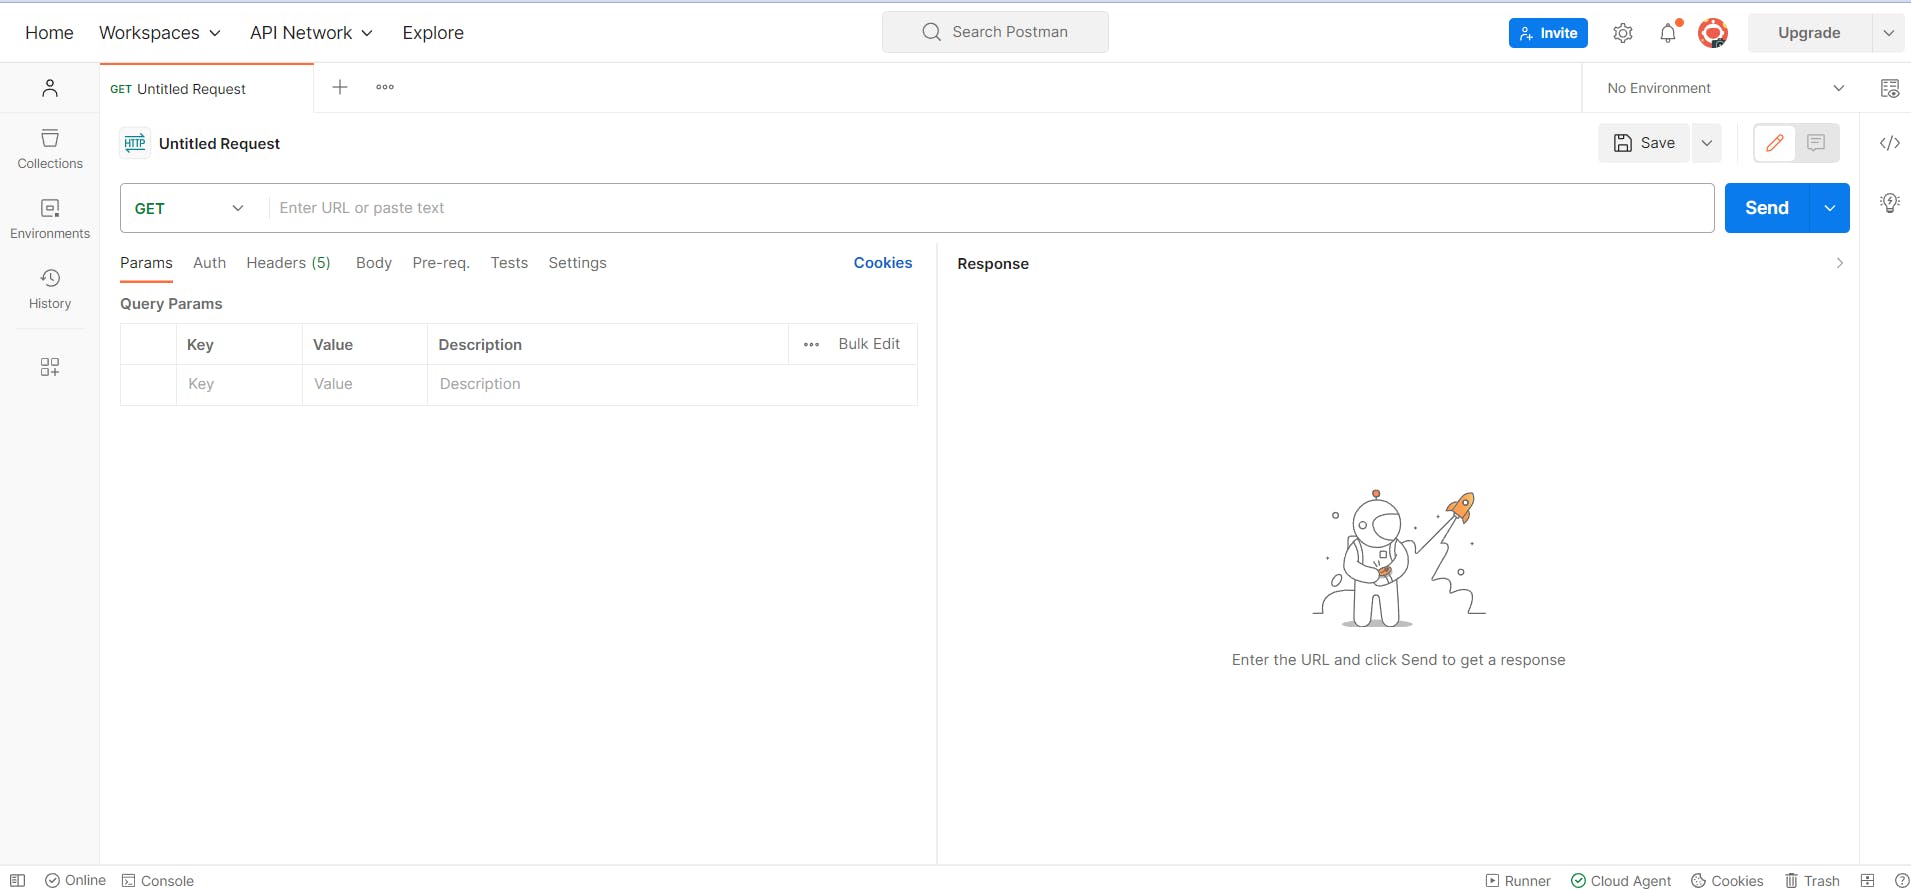
Before entering the URL let's secure your API key in Postman.
Click on Enviroment Quick Look (it's an icon) beside "No Enviroment" and we'll add your API key.
Click on Edit to add your apikey.
The variable name could be anything but we'll try with
apikey.The type is
default.Initial Value is your API key from weatherapi.com
Click on 💾Save.
Now back to entering the URL. Enter this👇🏻
https://api.weatherapi.com/v1/current.json?key={{apikey}}&q=Bangalore&days=3&aqi=yes&alerts=noThe q is the query and the name of the place you're trying to get Weather from.
Click "Send"
A response appears. Or an Error. If former, Congrats! the API works. You can experiment with it using the documentation to see different results.
Let's use this URL on our website now.
Sprinkle some logic into our website ✨
We should probably safeguard the API key by creating a separate file to store it and call it from there.
Create a New File called config.js in the same folder and add the code below.
var config = {
    apikey: "<YOUR_API_KEY>",
};
Replace <YOUR_API_KEY> with your API key.
Let's now create a Javascript file that'll serve as the logic that calls the API and retrieves the weather data.
We begin by calling the API when the User clicks on submit.
document.getElementById("search").addEventListener("click", apicall);This line of code uses the
addEventListener()method to attach theapicall()function to the click event of the element with the ID "search." This means that whenever the user clicks on the element with the ID "search," theapicall()function will be called.Let's create the
apicall()function.function apicall() {}Declare the variables.
 const apikey = config.apikey;
 const cityname = document.getElementById("cityname").value;
 const url = `https://api.weatherapi.com/v1/current.json?key=${apikey}&q=${cityname}&days=3&aqi=yes&alerts=no`;
These lines of code construct a URL for the API call. The URL includes the API key, city name, and other parameters. The
dayparameter specifies the number of days of weather data to return. Theaqiparameter specifies whether to return air quality index data. Thealertsparameter specifies whether to return alert data.The
fetch()function.fetch(url) .then((response) => response.json()) .then((data) => {}This line of code uses the
fetch()function to send a GET request to the specified URL. Thefetch()function returns a Promise that resolves to the response from the server. The next.then()block is called when the Promise is fulfilled.Parsing the Output
 let currtemp = `
 <div>
 <p>${data.current.temp_c}<sup>℃</p>
 </div>`
 ;
 document.getElementById("currtemp").innerHTML = currtemp;
This line of code creates an HTML string output containing the temperature value from the received data. The
dataobject contains the weather data for the city that the user requested. Thecurrentproperty of thedataobject contains the current weather conditions for the city. Thetemp_cproperty of thecurrentobject contains the current temperature in degrees Celsius.We repeat this step to get other data like Condition and Windspeed.
Error checking
}).catch((err) => console.log(err));This line of code catches any errors that occur during the process and logs the error message to the console.
The Entire index.js file is given below.
document.getElementById("search").addEventListener("click", apicall);

function apicall() {
    const apikey = config.apikey;
    const cityname = document.getElementById("cityname").value;
      const url = `https://api.weatherapi.com/v1/current.json?key=${apikey}&q=${cityname}&days=3&aqi=yes&alerts=no`;
      fetch(url)
    .then((response) => response.json())
    .then((data) => {
          let currtemp = `
          <div>
            <p>${data.current.temp_c}<sup>℃</p>
          </div>`
    ;
          document.getElementById("currtemp").innerHTML = currtemp;
        let condition = `
        <div>
            <p>${data.current.condition.text}</p>
        </div>`
    ;
    document.getElementById("condition").innerHTML = condition;
    let windspeed = `
        <div>
            <p>${data.current.wind_kph}<sup>kmph</p>
        </div>`
    ;
    document.getElementById("windspeed").innerHTML = windspeed;
        }).catch((err) => console.log(err));
}
The meal is prepared, garnish with creativity.
You can experiment with additional data like adding multiple-day forecasts or Air Quality Index.
You can check out my entire code from my GitHub repository here. The website works like this.

Congrats on making it this far! Hope this tutorial helped you get started with your API journey.
Thank you for reading 💓, please like my blog which keeps me motivated to write more content, and also don't forget to leave your views down below 👇.
Here have a cookie 🍪.
This blog is part of the WeMakeDevs X Hashnode Blogging Challenge. They provide amazing prizes for winners. Do check 'em out. I'm participating in the Development track.